News
Manage the visibility of the content you create
Would you like to provide your members who are up to date with their membership fees with information, offers, and specific videos? It's possible, and you can manage it in your back office.
Create a builder page, a dynamic page or a static page accessible only to paying members
To create a dynamic page accessible only to your paying members, go to Web Admin > Menu Management > Tree View.
This gives you access to all your menus.
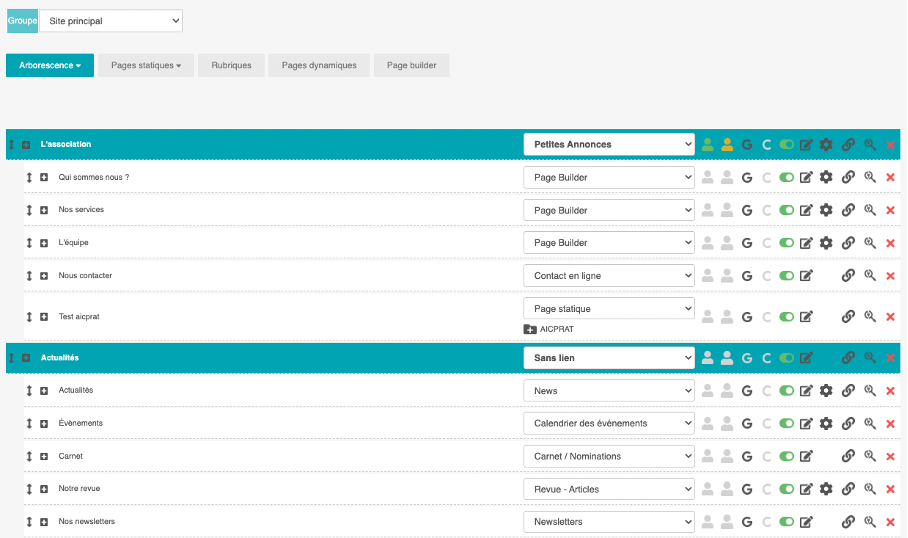
You can manage the visibility of each of your pages by clicking on the "stick figures" icon

by clicking on the first figure, your content will be accessible to all members (both paying and non-paying)

By clicking on the second person, your content can only be accessed by paying members only

if you don't select any characters, then your content will be visible and accessible to everyone
Click on the different figures according to your needs and then click on "validate" at the bottom of the page to save your settings.
Add content within a page dedicated to paying members only
You can also manage the visibility of your content within the same page. In other words, on a single page , you can have content accessible to different audiences (members, paying members, non-paying members). You can also have certain information or blocks restricted to a specific audience.
Please note that this can only done through the page builder. Once your page is built, you can choose an audience for each block.
For example, on your services page, you can display all services offered by your association and choose to restrict certain services to be viewed by by paying members only.
To do this
- Click on Web Admin > Menu Management > Page builder
- If your page builder is already created, then select the page in question by clicking on the "edit" icon, otherwise click on "Create a new page".
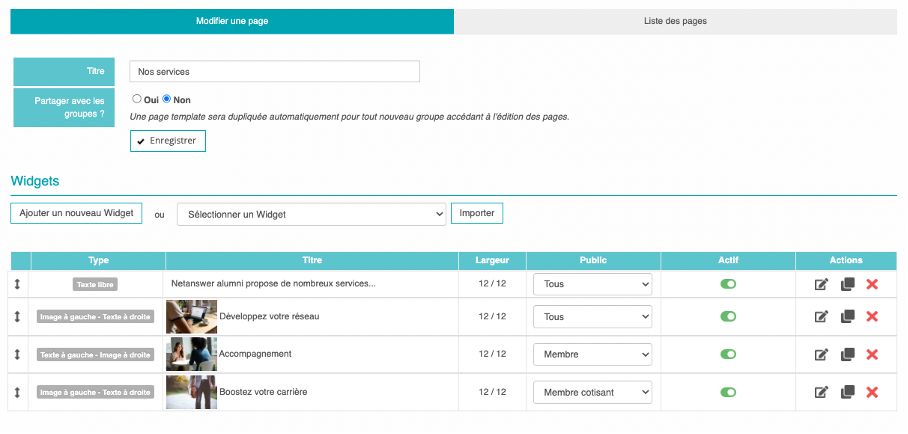
When you are on this page, the 'audience' column lets you to choose which audience you want be able to access your content.
By clicking on the drop-down menu, you will see the different options
- Accessible to all
- Accessible to members
- Accessible to paying members
- Accessible to external individuals
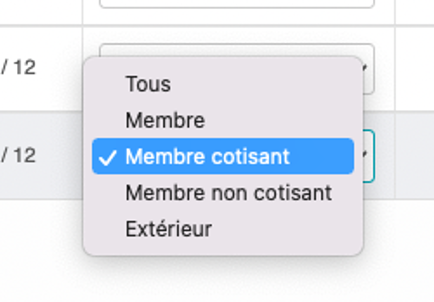
Click on the option you want. If you select "paying members" only paying members will see your content. Non-paying members will only be able to see the other information on the page.
Manage the visibility of your news
You can also manage and create news dedicated to a specific audience. To do this, go to the Publication tab > Creation and click on "Create a news item"
Write your news and layout it using the different content blocks at your disposal.
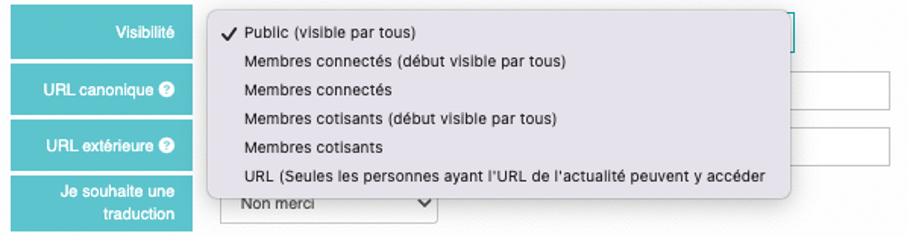
At the bottom of the page you have a "Visibility" setting. Clicking on the drop-down menu will give you several options:
- Public ( visible to everyone)
- Visible to logged in members (beginning visible to all)
- Visible to logged in members only
- Visible to paying members only (beginning visible to all)
- Visible to paying members only
- Visible only to people who have access to the url
If you select "Visible to logged in members (beginning visible to all)" members who are not logged in will only be able to see the first 100 characters of your news item. This lets you "tease" your news and make members want to log in to read more. To access the full news article, the member will then need to log in using the login box.

If you select "Visible to paying members (beginning visible to all)", non-paying members wwill only be able to see the first 100 characters of your news item. This lets you "tease" your news and make members want to become a subscribing member to read more. To access the full news article, the member will then have to click the "Subscribe now". They will then be redirected to the contribution page.

Once your settings are complete, click on the Save button at the bottom of the page to save your update.
 1
1


No comment
Log in to post comment. Log in.